- I dried some sourdough by spreading it with a knife on a plastic bag and then let it sit for a day. Then I collected the dried up pieces into a small Ziploc container and put them into the freezer. The idea is to defrost them in a month time and test whether the reconstituted sourdough will be any good.
- My latest batch of new bread consisted of two loaves each of 25% rye and 25% whole wheat bread. The whole wheat dough was of great consistency and easy to work with. The rye dough was rather wet and impossible to knead: It just gummed up my fingers. Surprisingly, all loaves came out rather good, even the rye bread that I could I could not knead and that I finally just left to mold itself into the bread pans.
- I tried myself at another rennet cheese. I am wondering whether I am setting the curds at a high enough temperature because mine are not as firm as they look in pictures. Will try setting at a higher temperature next time.
- My cheese press was a disaster this time, leaking cheese big time and forcing me to repack the curds repeatedly. Maybe it's because the curds were too soft. Even if they were I believe my design could bear some improvement. Still thinking about exactly how.
- Did another batch of yogurt, with full fat milk but without milk powder. The result was rather soft and I had made sure the incubation temperature was as high as possible. It might still be worth it to live with softer yogurt in the future it that means I can cut out milk powder as a necessary ingredient.
- Tried the first two bottles of my second batch of beer. Not sure what to think because it is rather different from the first batch. It's not bad I think (it still officially needs a few days of aging) but I would like to know what accounts for the marked difference of the two batches when the recipes were almost the same.
Showing posts with label yogurt. Show all posts
Showing posts with label yogurt. Show all posts
Wednesday, May 29, 2013
Quick takes
So much to do, so little time left to write. Therefore, just a quick summary of the latest happenings in the chaos kitchen:
Tuesday, May 14, 2013
All well in the yogurt department
Yesterday night I started a new batch of yogurt, and with quite some trepidation after the "runny" batch I produced last time. Not that I really should have been- after all, I believed my analysis of the causes of the runniness was sound, and my planned fixes seemed appropriate as well. Yet, there is always that residual worry- in this case that it might be my starter turning bad after all.
Well, the news is good. I stayed with the hot milk as it cooled to make sure I would pitch my starter the moment my pinkie could tolerate the heat of the liquid for ten seconds. I wasted little time wrapping the covered bowl into my beach towel and transferring the wrapped bundle into the oven. And as planned, I left the oven light on as the yogurt was incubating over night, as to "harvest" that little extra heat emitted by that tine light bulb.
And the result? Very satisfying: Firm almost like store yogurt, and the same pleasant tartness I have grown accustomed to. So it seems fair to say it is a too low incubation temperature that causes runny yogurt, at least with my personal ingredients and procedures.
With this settled, should I just leave it now and stop tweaking with the formula? I probably should, and I most certainly won't. After all, I am still curious whether I can make firm yogurt without the addition of milk powder, by using full fat milk instead of the 2% milk I am using now. The last time I tried I failed. But then, I also wondered if my incubation temperature was warm enough that last time when I failed. So I think the time has come to try again.
Tuesday, May 7, 2013
Labneh and Quark
I have fallen for yogurt and buttermilk making to the point that I am now producing way more than I can possibly eat and drink. I have therefore started to not just eat and drink my yogurt and buttermilk, but to also use them as raw materials for other things. By far the easiest are Labneh, and Quark.
Labneh is popular mostly in the eastern Mediterranian where is is found under several different names, such as strained yogurt, and Greek yogurt. Quark hails mostly from central, northern, and eastern Europe. "Quark" is actually the German term for it, and I am quite sure there are at least a dozen more names for it in all the local languages spoken in that area.
The only difference between Labneh and Quark is that labneh is made from yogurt and Quark is made from buttermilk. Apart from that, recipes and instructions are exactly the same. The following recipe yields about 12 ounces of Labneh or Quark, at a cost of about $1 per batch (depending on the price of milk, of course):

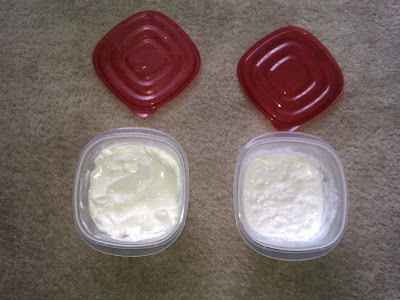
The image to the left shows containers of both labneh and quark. They are actually quite similar in appearance, the labneh being a little firmer and more homogeneous than the quark.
They taste quite similar as well; the quark feels just a tad milder than the labneh. And either one works great either as a spread on my bread or boiled peeled potatoes. Last not least, either makes a great base for a dip when combined with onions, garlic, or chives.
Labneh is popular mostly in the eastern Mediterranian where is is found under several different names, such as strained yogurt, and Greek yogurt. Quark hails mostly from central, northern, and eastern Europe. "Quark" is actually the German term for it, and I am quite sure there are at least a dozen more names for it in all the local languages spoken in that area.
The only difference between Labneh and Quark is that labneh is made from yogurt and Quark is made from buttermilk. Apart from that, recipes and instructions are exactly the same. The following recipe yields about 12 ounces of Labneh or Quark, at a cost of about $1 per batch (depending on the price of milk, of course):
- Equipment:
Flour sack: They can be bought at any department store in packs of four or five, for about a buck a piece. They are typically in the kitchen section, near the dish towels. The flour sack can be washed and reused after this.
Small bowl: To catch the whey from the draining yogurt or buttermilk. Need not be bigger than a quart.
Fridge space: The bowl has to fit and there has to be enough head space to suspend the flour sack with the yogurt or buttermilk over it. - Ingredients:
Yogurt or buttermilk: One quart.
Salt: About one teaspoon. - Add the salt to the yogurt or buttermilk and mix well.
- Line the bowl with the flour sack and dump the salted yogurt or buttermilk into it.
- Move bowl and the flour sack containing the yogurt or buttermilk into the fridge. Suspend the flour sack and put the bowl under it so it will catch the draining whey. My own setup looks like this:

- Leave the yogurt/buttermilk suspended like this for the next 24 hours.
- The labneh or quark is ready. Remove the content of the cheese cloth into its final storage container.

The image to the left shows containers of both labneh and quark. They are actually quite similar in appearance, the labneh being a little firmer and more homogeneous than the quark.
They taste quite similar as well; the quark feels just a tad milder than the labneh. And either one works great either as a spread on my bread or boiled peeled potatoes. Last not least, either makes a great base for a dip when combined with onions, garlic, or chives.
- Leave the draining yogurt or buttermilk suspended over the bowl for about 24 hours.
Runny yogurt again
Once again I wound up with a batch of yogurt that did not set well. It still tastes alright, like it is supposed to, but it is very runny. This happened once before when I was using whole milk and cut the milk powder. Back then I speculated that the milk powder was indeed necessary for well set yogurt, and when the next batch (which included milk powder) was set again I felt my speculation had been confirmed.
The problem is that I did include milk powder in this batch and it still did not set. So I have to look at alternative explanations. The two most obvious are the ones I had already considered the last time: That my starter has somehow gone bad, and that my milk/starter mixture was already too much cooled down when I transferred it into the oven.
I don't think and I don't want to think it is the starter. That there was some thickening and souring suggests that the starter was definitely alive. Apart, I am growing emotionally attached to my starters as "mine", and they just wouldn't feel like mine if I was forced to replace them with new starter cultures from the store every so often.
So I am stuck with the theory that incubation temperature was too low for optimum result. Which actually makes some sense; the temperature of the mixture did seem a bit lower this time than it usually is. As it was with my last runny yogurt, as I recall. Following this approach I will make the following changes for my next batch:
- Stay next to the pot as it cools down so I can catch it before it cools too much. Don't rely on the thermometer but use the pinkie finger test.
- Keep the oven lamp on overnight while the yogurt is incubating. Hopefully, that will keep the incubation temperature higher for longer.
- The yogurt base will once again be one gallon of 2% milk thickened with one cup of non-fat milk powder.
- I will continue to use my own starter which will be a small sample of this runny yogurt that I just made.
Tuesday, April 30, 2013
Yogurt results
My yogurt turned out beautifully, just as I had expected. When I removed the towel wrapped pot with the yogurt it was still a little warm, proving that the oven was a perfect place for incubation. I got two half gallon pitchers out of it, along with maybe half a cup on the side, as a starter for the next batch. I remember once in the past I ate up my entire yogurt supply completely forgetting I would need a starter for the next batch. Ever since, I made it a point to keep the next starter separate from the other supply, just in case.

Not counting utilities (electricity to run the pot, water to wash the dishes), the gallon batch of yogurt came to about $3.60. This is cheaper than straight milk in most stores hence a pretty good deal. Comparable to store bought yogurt in its firmness but without cheap tricks like adding gelatin to the mixture. OK, may be the milk powder counts as a trick as well but not a cheap one and definitely one I can happily live with. In taste it is very much like store bought, maybe a little sweater (or maybe not because I usually get nonfat yogurt from the store while I made my own batch from 2% milk).

Not counting utilities (electricity to run the pot, water to wash the dishes), the gallon batch of yogurt came to about $3.60. This is cheaper than straight milk in most stores hence a pretty good deal. Comparable to store bought yogurt in its firmness but without cheap tricks like adding gelatin to the mixture. OK, may be the milk powder counts as a trick as well but not a cheap one and definitely one I can happily live with. In taste it is very much like store bought, maybe a little sweater (or maybe not because I usually get nonfat yogurt from the store while I made my own batch from 2% milk).
Monday, April 29, 2013
Homemade yogurt
I just completed my evening work with the seeding of a batch of yogurt. I have always liked yogurt, but usually would not justify the expense of yogurt over plain old regular milk. I can get a gallon of milk for three dollars but a quart of yogurt sets me back by two. Which is eight bucks to the gallon- yikes!
Then I came across that recipe that allowed me to make my own yogurt, one gallon at a time in the crock pot, and at a cost marginally more than regular milk.
So here is how it works:
Then I came across that recipe that allowed me to make my own yogurt, one gallon at a time in the crock pot, and at a cost marginally more than regular milk.
So here is how it works:
- Materials:
a crock pot big enough to hold a gallon of milk,
thermometer (optional),
a blanket or beach towel,
an oven or cooler big enough to hold the hold the crock pot. - Ingredients:
a gallon of milk (I personally tried 4% and 2% and both worked fine),
a cup of milk powder (optional, the yogurt will taste fine without it but it be rather soft and runny),
the starter, like a cup of store bought Dannon plain yogurt, or simply a cup from a prior batch. - Put the milk into the crock pot. Mix in the milk powder. I do that by mixing the milk powder in the mixing bowl with part of the milk and then adding the mixture back into the crock pot.
- Turn the crock pot to "Low" and leave it alone for about four hours, less if the milk was warm to begin with.
- Turn off the crock pot, remove the bowl and cool bowl and content down to about 110° F. I do that by putting the pot into the sink, then fill the sink around the pot with cold water. Remove the lid and slosh the water around for faster cooling. 110° F are reached when the thermometer says so, or when you can stick your pinkie finger into the milk and keep it in there for 10 seconds.
- Add the starter to the milk and stir for even distribution.
- Put the lid back onto the crock pot, wrap the thing into the blanket or beach towel and move the entire packet into the oven or cooler. Don't turn on the oven, it's for heat retention only.
- After 24 hours the magic of fermentation will have done its thing and turned the milk/starter mixture into a gallon of delicious homemade yogurt. Transfer into their storage containers to reclaim the crock pot, keeping about 3/4 of a cup on the side as a starter for the next batch.
Subscribe to:
Posts (Atom)