- I dried some sourdough by spreading it with a knife on a plastic bag and then let it sit for a day. Then I collected the dried up pieces into a small Ziploc container and put them into the freezer. The idea is to defrost them in a month time and test whether the reconstituted sourdough will be any good.
- My latest batch of new bread consisted of two loaves each of 25% rye and 25% whole wheat bread. The whole wheat dough was of great consistency and easy to work with. The rye dough was rather wet and impossible to knead: It just gummed up my fingers. Surprisingly, all loaves came out rather good, even the rye bread that I could I could not knead and that I finally just left to mold itself into the bread pans.
- I tried myself at another rennet cheese. I am wondering whether I am setting the curds at a high enough temperature because mine are not as firm as they look in pictures. Will try setting at a higher temperature next time.
- My cheese press was a disaster this time, leaking cheese big time and forcing me to repack the curds repeatedly. Maybe it's because the curds were too soft. Even if they were I believe my design could bear some improvement. Still thinking about exactly how.
- Did another batch of yogurt, with full fat milk but without milk powder. The result was rather soft and I had made sure the incubation temperature was as high as possible. It might still be worth it to live with softer yogurt in the future it that means I can cut out milk powder as a necessary ingredient.
- Tried the first two bottles of my second batch of beer. Not sure what to think because it is rather different from the first batch. It's not bad I think (it still officially needs a few days of aging) but I would like to know what accounts for the marked difference of the two batches when the recipes were almost the same.
Showing posts with label sourdough. Show all posts
Showing posts with label sourdough. Show all posts
Wednesday, May 29, 2013
Quick takes
So much to do, so little time left to write. Therefore, just a quick summary of the latest happenings in the chaos kitchen:
Friday, May 24, 2013
Maryland chicken bread
OK, I will admit to it right away: The only chicken in this bread is the chicken fat I used to fry the onions. But it still makes for a great name and sometimes, that's important, too. Anyway, I was on the prowl again, trying to find another winning bread recipe. This time, it was all the chicken grease left from boiling down four pounds worth of chicken that caught my attention. I had already discovered that grease from bacon does bread good, and I like onions anyway, in particular fried and as part of my bread. So what would seem more natural but to use all that chicken fat as part of my latest batch of bread?
I started out in my standard way: Mix four cups of general purpose what flour with two cups of water and add my sourdough starter. Cover the bowl and leave alone over night; the result should be a very active, bubbly dough. The second stage calls for the addition of slat, an extra four cups of flour, and an extra cup of liquid. While I always stick to all purpose what flour and water in the first stage I do grant myself more freedom in the seconds stage. For example, I have used rye flour in the past and with good success. This time I opted for two cups of additional all purpose, and two cups of whole wheat flour. And for the liquid I used a cup of chicken broth (without the fat, I needed that for the onions). After all, I had more broth left over that I could likely use- so I may as well do the experiment.
After another night of fermentation the dough was almost climbing out of my bowl! While the rye in the past seemed to retard fermentation a bit the new combination yielded the strongest development I had seen so far. Of course, there is no telling whether this was due to the whole wheat flour or the chicken broth. While it will take another experiment to settle this point I would have to guess it's the whole wheat flour. Why? Mostly, because I want it to be the whole wheat flour, and to me that's reason enough.
So I got my dough, consisting of eight cups of flour and three cups of liquid. It was fermenting very well and I figured it had enough punch for at least two cups if not four of extra stuff, ingredients that would supply flavor and aroma, but would develop little or nothing to crumb and crust development. And it is here that all the chicken fat and the onions come in. I used all the grease I had; I think it was almost a cup of it. As for onions I had used about a medium sized onion per loaf of bread the last time and it had left me wanting more. So make that two medium onions per loaf. And with enough dough to make four loaves of bread that was eight onions to peel and chop. It was definitely the low point of this baking experience.
When frying the onions I started out with big pot full of onions but I was surprised how much the volume had come down by the time the onions were well browned. The remaining mixture of fat and onions was maybe two cups- definitely not more. And very greasy indeed!
Anyway, I mixed everything well and formed my four loaves. Usually my dough is on the dry side- easy to work with (like playdoo) and very sticky. This dough here was so greased up it would not stick to nothing. And it was so soft it would not hold a shape- so bread pans definitely are required equipment for this type of bread. With my loaves in the bread pans I let them sit at room temperature for the next three hours, while running some errands and a lot of kitchen cleaning.
When I returned to my bread loaves they each had about tripled in volume. The top surface which would usually have started to dry out after that much time in the open was still so soft I could not even score the bread properly- I basically just poked lots of holes into the loaves with the tip of my knife, trying to convince myself this was doing any good. I debated with myself whether there was any point in waiting any longer but decided against it. The dough was too greasy to expect it it dry more within any reasonable time, so I may as well go ahead.
I gave my bread the standard oven treatment: 400°F, for at least 40 minutes. What I actually did was spray the bread with water every 15 minutes, and then after 40 minutes start monitoring the bread carefully. I left it in until the crust looked like if should not take any more which was about 50 minutes. Then I removed the bread from the oven, and the loaves from the pans (which was easy with bread loaves greased like that).
And --- it was a very pleasant surprise! The bread smelled great; great enough to bake more in the future just to have it sit around and smell! Even better, it tastes pretty good, too! Good enough I am eating it without anything on it or with it- it does not need anything. Maybe a little bit more salt next time, either mixed in with the onions or added to the dough. After all, the dough had been fermenting so well I am sure it could tolerate the extra salt and still ferment pretty good. Oh, yes, and before I forget, I do think the bread would be even better with maybe a few more onions ---

Anyway, it has been a great experiment, and I am sure there will be refinements in the future. Also, the effect of whole wheat flour on dough development needs checking out. Or what other types of flour will do, like corn or rice flour. Or oatmeal, doesn't that sound interesting? So many breads to bake- I do have to make an effort to recruit more people to eat it!
Saturday, May 18, 2013
Bread plays
All my bread from the last batch is gone and I had actually fun eating it. The pure sourdough breads tasted better than the ones with the extra yeast- because the extra yeast had left behind a tiny but discernible yeasty taste and it's not necessarily a good taste. So I decided the extra yeast was not be worth it. Sourdough alone can do the job, and it actually tastes better.
Another thing I could not help noticing is how quickly bread ages. It tastes like something from paradise when it is still warm from the oven. It tastes great the next day, and so-so on the next. Any additional days and you just hope to get done with it and move on to a new batch. However in the long run, I want to only bake once a week, or twice at the most if somebody else will be eating, too. Meaning I need to figure a way the make the bread taste great for longer. Which, though, is a quest for the future because today's quest was to make even more bread.
My first dough was the standard fare: Add the starter to four cups of wheat flour (unbleached, all purpose) and two cups of water, mix well, let sit. I have to admit the "let sit" part has become a little informal lately. I literally let it sit over night. And since I had to go to work the next day I had it in the fridge for ten more hours after that. Needless to say, my dough was very bubbly after that.
After that came the fun part: I separated the first dough into four equal batches for further experimentation. To the first part I simply added another cup of all purpose wheat plus a quarter cup of water, plus a teaspoon of salt. This mirrors my standard formula, and meant to represent my control experiment.
In the second batch I used rye flour instead of wheat, and also added that extra quarter cup of water and the salt. Rye breads (or rather, half and half) are pretty much the norm where I grew up in southern Germany, and I was curious whether I would get anything resembling the taste of home.
Batches three and four resembled batches one and two (i.e. one wheat, one rye) but with a twist: I cut about 6 oz of bacon into little pieces, fried it, and used the fat to brown two medium onions (also cut into little pieces). The result, fried bacon pieces, browned onion pieces, and a fair amount of fat I added in equal proportions to my batches three and four. Before forming the loaves I let each batch sit for another night, followed by another day in the fridge.
I formed loaves from each of my batches, put them into their baking forms, and once again let them sit. Actually, I went for a run while they were sitting and when I run I tend to run for a long time. Meaning these loaves had been sitting for about three hours when I got back and were about twice the size they had started with.
The baking was the normal fair, 45 minutes at 400°F, in accordance with my observations the last time I baked, and the same for each of the loaves. And the result has been very pleasing to say the least:

The straight what loaf is to the left and the straight rye is next to it. Then the bacon/onion wheat, and the bacon/onion rye is all the way to the right. Looking at the loaves from the side

reveals first of all that my score marks were ineffective. Both wheat breads broke up wherever they wanted instead along the score marks. But that's easily fixed- I just need to score after forming the loaves next time rather than waiting until just before I put them into the oven.
More interestingly, wheat dough obviously rises more than rye, so (keeping everything else equal) wheat bread is fluffier and rye bread is denser. The bacon/onion breads to the right look bigger than the straight breads to the left but I think that just reflects the added volume of the bacon and the onions. But it is certainly safe to say the addition of the bacon and the onions did nothing to impede the development of the dough.
Best of all, all breads taste great. Even the straight wheat is an improvement is an improvement over last time, most likely on account of the extra five minutes in the oven. The rye bread is great too and I would say better. The rye seems to go well with the sourdough flavor- positively a keeper recipe. And the bacon/onion loaves are just delicious, both of them! Like bread with built in Schmalz. I can't really decide which one is better but it is safe to assume I am going to go with this combination again, in the not too distant future!
So what will I take away from this experiment? Here are the most important observations:
- I good sourdough bread takes two days to make. It's only about an hour's worth of work and the dough will be sitting on the counter or in the fridge almost all of this time but still: The dough needs time to develop.
- Pure wheat dough rises more than a wheat-rye mixture. I could imagine a pure rye bread would turn out extremely dense but that's of course just speculation at this point.
- Extra non-starchy adjuncts like bacon and onions do not affect dough development. If anything then the extra fat made the dough easy to work while kneading and making the loaves.
- Score the bread immediately after the loaves are formed. The score marks won't do much good after the dough has fully risen.
Wednesday, May 15, 2013
Sourdough notes
As already reported my last sourdough bread experiment left me with a lot of dense bread. But after living on that bread (and my rennet cheese) almost exclusively for the last few days I was ready for a new batch. I followed the protocol described in my last sourdough post:

- Mix the starter with four cups of flour and two cups of water, cover and let sit for a day,
- Add another four cups of flour, four teaspoons of salt, and one cup of water (the extra cup of water is new), let sit for another two hours or so,
- Form and score the bread loaves (four bigger sized loaves this time instead of the six smaller ones), let sit for another half hour,
- Bake it while spraying it with water every ten minutes. Total baking time was 40 minutes at 400°F, up from 30 to 35 minutes from the smaller loaves made without the extra water.

Of course, there are some observations to carry on toward the inevitable future experiments:
- I does not seem the extra yeast has made much difference in the finished bread (though it seemed as if the dough with the extra yeast had risen I little bit more before baking). So even if there is a difference it is not very significant- at least not for the pure wheat bread I am currently making.
- There were a few spots in the crumb that seemed a little too wet. I believe I can fix that by baking the bread a little longer the next time around. The crust also looks as if it could take some extra minutes of baking without me having to worry about it getting burnt.
- Once again, the salt is not all evenly distributed. Next time I will try dissolving it in the extra water added in the second stage of the dough making.
So stay tuned!
Sunday, May 12, 2013
Water versus yeast in dough
Most if not all of my sourdough breads turned out rather dense. Some actually were dense to the point of being almost impossible to chew, and even the softest was only marginally fluffier than pumpernickel. I developed two alternative theories as to why that would be:
So this weekend I decided to launch the control experiment, by first making another batch of the dry dough:
From that point on, I once again treated both batches the same:

- My sourdough just isn't that good at raising the dough. After all, sourdough is based on wild yeast which may not be as good making bubbles than a yeast bread in the lab for the expressed purpose of producing lots of bubbles.
- I am not using enough water. My low water dough works and feels like play-doh which is great. But it may be the yeast paying the prize for my non-stick dough by not having enough water to develop.
So this weekend I decided to launch the control experiment, by first making another batch of the dry dough:
- Mix the sourdough starter with four cups of flour and two cups of water. Allow the starter to ferment that dough until the dough is thoroughly bubbly.
- Add another four cups of flour and four teaspoons of salt, work everything into my typical non-stick dough.
From that point on, I once again treated both batches the same:
- Knead the dough thoroughly then let it sit over night so the dough can rise as much as it wants to.
- Knead the dough one more time, form the bread loaves, and put them into their oiled forms.
- Bake the loaves while periodically spraying them with water until they appear to be done, half an hour at 400°F in each case.

Yes, me too. There is no discernible difference at all. Both are the size of a large dinner roll. But make no mistake they each have the weight a small loaf of bread is supposed to have, about 10 ounces.
And it wasn't just a fluke because I made three loaves each. If there is any difference at all it is not in the size of the loaves. Rather, the "sourdough plus yeast" bread has a few more cracks. I could speculate as to why that would be but I won't.
What we can now pretty much take for granted is the following: My dough is too dry and that's the limiting factor right now. Nothing else will make a difference unless I use more water in my dough first.
We do not know yet whether sourdough is just as powerful fermenter than baker's yeast. It could be that baker's yeast performs better once the water constraint is removed. Which would make another neat experiment- after I am done eating those six high-density loaves resulting from this experiment, that is ---
Monday, May 6, 2013
More sourdough bread
Educated by three prior attempts at sourdough bread which all failed or succeeded to different degrees I was ready yesterday to give it another try. To recall: All of the prior attempts were too dense in their crumb. They all had a crust that was way too hard and dry. And the salt was unevenly distributed in the last loaf. The first two times I did not allow the dough enough rise time. In the last attempt the dough had risen plenty but I am speculating that the dough was too dry when I formed the loafs. So I needed more water in the dough. So this time around I was following this modified procedure:
 The result were three good looking 14 ounce loafs, except for a cracked crust along the length of the bread; in real on the kitchen counter these loafs were looking better than in the picture. And the cracks should be readily fixed by scoring them next time before putting them into the oven (and that should make them look even nicer, too).
- I mixed my starter culture with a cup of flour and half a cup of water and let it sit in a plastic wrapped bowl until the entire mixture was all bubbly. This took less than 12 hours.
- I added another two cups of flour, one cup of water, and two teaspoons of salt and once again mixed it all up. Again, I let it sit in the wrapped bowl until bubbly.
- I added yet another cup of flour (but no water) and kneaded it all down. When it was still way too sticky to work and form loafs with I slowly added some more flour, maybe another quarter cup total. I sprayed my hands with oil while kneading or otherwise the dough would have stuck all over my hands.
- When I decided it was enough kneading the dough was still trying to sticky, both to my hands and the working surface. And it was definitely too wet that I would have trusted it to retain the shape of a loaf in the oven.
- To enforce some shape onto the loafs I used three 2 pound baking pans. I oiled them down with cooking spray. I divided the dough into three mini loafs and put in in each of the pans. I covered the pans with a towel and then let them rest at room temperature, for three hours.
- I baked the loafs at 400°F for 35 minutes, spraying the top with my water mister repeatedly. I removed the loafs from the pans almost immediately, then allowed the loafs to cool over night.
 The result were three good looking 14 ounce loafs, except for a cracked crust along the length of the bread; in real on the kitchen counter these loafs were looking better than in the picture. And the cracks should be readily fixed by scoring them next time before putting them into the oven (and that should make them look even nicer, too).
The crumb is still dense but given that I am working with pure sourdough I am not sure the crumb could ever be much lighter than this. Too salty? Definitely not, if anything than it is missing some salt. Or rather not. Most eating tables come with salt shakers these days. So it is easy enough to sprinkle salt on the bread if so desired, and I declare myself satisfied with my crumb.
The crust, the worst of all my prior breads, was the best part of this batch, to the point even that I ended up slicing the crust off the bread as a special treat. If anything, it was not chewy enough this time. Which once again seems very fixable the next time, by simply leaving the bread in the oven for a few minutes longer.
While I am very pleased pleased with the outcome of this latest sourdough experiment there are some tweaks of course that I would like to try. These are:
- It seems as if steps 1 and 2 from the above listing could be combined. There is a risk adding the salt earlier may negatively affect the yeast. If so it would prolong the rise time (at best) or keep the dough from fully developing (at worst). But I think the risk is low, and I want to try at least once.
- The bread pans had still plenty of head space when I took then out of the oven. I should therefore use a total of four cups of flour ans two cups of water for the dough. That's 33% more bread for pretty much the same effort.
- Score the loafs before baking. Hopefully that will keep them from cracking lengthwise.
- Bake the bread an extra five or ten minutes for extra crust. The extra dough may affect baking time as well so an extra five minutes may not do. But hey, that's why I spend my time near the kitchen so I can keep an eye on these things.
Thursday, May 2, 2013
"Balloon" taste test
I had a hard time making myself wait to the next day for the look, feel, and taste test of the sourdough loaf I dubbed the balloon. Well, I just gave it a try and here are my observations:
If the dough is wetter then the crust should not dry out as much during baking. A wetter dough should also fuse seams and folds more readily than dry dough does. Wetter dough should also produce a juicier crumb and may also allow for bigger bubbles to develop. Last not least it should be a lot easier to work the slat into wet dough than into a dry dough that's mostly already set.
The downside? Well, it is messier to knead wet dough than dry. Maybe I can put some oil on my hands for the kneading to avoid most of the stickiness. Also, a wetter dough will not hold its loaf shape as well as dry dough does. The photo of the "balloon" suggests I have plenty of margin, though. Trying more water in the dough seems therefore pretty much obvious.
How much more water? Well, that's the trick. So I am not yet expecting the next attempt to be a home run. A few attempts may be necessary to determine just the right amount of liquid. Until then, I do hope for incrementally better bread with each new iteration.
I can't wait to get started!
- The crust is thick and hard but still acceptable for bread it also broke up in a couple of places. Believe the cracks in the crust are from imperfections while forming the loafs when seams and folds were not properly fused before putting the bread into the oven.
- The crumb is a little dense and dry but once again, finally within acceptable range. It is full of bubbles but the bubbles are smaller than in store bought bread.
- The salt is not quite evenly distributed. I added the salt late to the dough to help out the yeast and had to resort to kneading alone to mix it into the dough. Apparently, that wasn't quite enough.
If the dough is wetter then the crust should not dry out as much during baking. A wetter dough should also fuse seams and folds more readily than dry dough does. Wetter dough should also produce a juicier crumb and may also allow for bigger bubbles to develop. Last not least it should be a lot easier to work the slat into wet dough than into a dry dough that's mostly already set.
The downside? Well, it is messier to knead wet dough than dry. Maybe I can put some oil on my hands for the kneading to avoid most of the stickiness. Also, a wetter dough will not hold its loaf shape as well as dry dough does. The photo of the "balloon" suggests I have plenty of margin, though. Trying more water in the dough seems therefore pretty much obvious.
How much more water? Well, that's the trick. So I am not yet expecting the next attempt to be a home run. A few attempts may be necessary to determine just the right amount of liquid. Until then, I do hope for incrementally better bread with each new iteration.
I can't wait to get started!
Wednesday, May 1, 2013
Sourdough bread attempts
I always have toyed with the idea of baking my own bread. And why not , given the abysmal bread culture here in the United States. Most of the stuff you get from the supermarket has about as much taste as the plastic wrapper it comes in, even if you pay premium for premium brands. You can go for artisan bread from the bakery but now it really get expensive. Besides, even the artisan bread doesn't taste like home, like when I was young, living somewhere in the German province.
Well, toying an ides does not by itself produce any bread, something more needed to be done. As in:
 I dubbed my first attempt the "cannon ball". Not so much for its shape but rather for its density. Even just opening the crust turned out an exercise in ingenuity. My biggest and strongest knife did do the trick when applied to the crust's weakest spot, seen on top, next to the spoon. Even then I was using the knife more like a chisel than a knife to get the trick done. Also note the strong coloration of the crust which served as a reminder I meant to buy that water spray bottle that the online recipe was taking about. And by the way, that spoon in the picture is a teaspoon.


Well, toying an ides does not by itself produce any bread, something more needed to be done. As in:
- Get or make a starter culture, either from bread yeast available from any supermarket, or by producing your own sourdough starter from scratch.
- With the starter at hand, make a dough. For beginners, only use starter, all purpose flour, a little salt, and water. Let the dough rise, form a loaf of bread, then let is rise a little more.
- Bake the bread. That would be at 400°F, until the outside was golden brown. By then, the inside would hopefully be done as well.
- Let the bread cool, eat, and enjoy!
The easiest is to make the starter from any type of baker's yeast available in the supermarket. It's a little harder to go for sourdough. The hardest part with the sourdough is not following the instructions but the long wait: It can easily take a week until the starter is ready. And while the wait drags on it is hard to tell exactly when the sourdough is ready. I figured it out now, the hard way: If you are not sure the sourdough is ready then it is not. It will be hyper active when it is. Like turning dough into running, bubbly, mush within a few short hours!
As I said, I learned that the hard way, by baking a couple of breads from sourdough that definitely was not ready. Impatient as I am I was too ready to take a small rise in volume as full fermentation of the dough. The bread I wound up with was still spectacular, though for all the wrong reasons.
 I dubbed my first attempt the "cannon ball". Not so much for its shape but rather for its density. Even just opening the crust turned out an exercise in ingenuity. My biggest and strongest knife did do the trick when applied to the crust's weakest spot, seen on top, next to the spoon. Even then I was using the knife more like a chisel than a knife to get the trick done. Also note the strong coloration of the crust which served as a reminder I meant to buy that water spray bottle that the online recipe was taking about. And by the way, that spoon in the picture is a teaspoon.
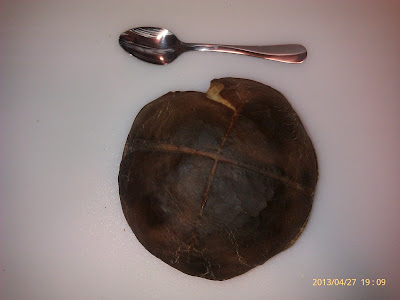
I launched my second attempt one day later, now armed with a brand new spray bottle. Since the sourdough starter was only marginally farther along at the time the result suffered from similar problems as the "cannon ball". While this bread had about 30% more volume than the "cannon ball" it was still plenty dense. And while the water spraying kept the crust from getting burnt it did not keep it from getting hard. Very hard- I did not name it "the turtle" for nothing.

Tonight, three full days after the turtle I made the next bread, with fully bubbly sourdough starter this time. Resulting in the "balloon": At at least double the volume of the "turtle" it has just about the density that bread is supposed have. The crust still feels a little hard but no longer like a turtle shell. The crust broke up in two places and I believe it is because my dough was too dry- which would also explain the hard crust. Anyway, what's beneath the crust should be good this time, and I cannot wait for the bread to cool enough to try. I am confident my mouth won't be sore from the chewing this time!
Subscribe to:
Posts (Atom)